Friday 19 December 2008

mimio Pad


Judy Bentley from Watermans demonstrated the mimio pad to me and I loved it. So what was so cool about this technology?
  1. you don't have to have all of the other mimio gear, it operates as a mimio itself, all you need is a projector, whiteboard and laptop
  2. With a mimio Pad, you can walk about the class or work with students individually while still being in control of what is on the Whiteboard up to 10 metres away. All the mimio tools are on the pad, and you use a pen as a mouse to activate them. As a Facilitator this will be invaluable for me in my courses as I will be able to walk around looking at what teachers are doing on their computers and instead of rushing back to the laptop I can stay there with the mimio Pad and continue to demonstrate what I need to show them
  3. It can be passed around to students to use, and if your projector still is not suspended from the ceiling but sitting on the desk, then you won't have to worry about students standing in front of the projector casting shadows on the Whiteboard
  4. It does not need software, all it uses is a small mimio wireless receiver (looks like a memory stick) that plugs into your computer's USB port. The integrated rechargeable battery provides up to 16 hours of wireless operation and the mimio Pad can also be USB charged.

Hint #1 pens and batteries


Check the batteries in your mimio and IWB pens on a regular basis! I had a leaking battery in mine and discovered it before it did too much damage. If you are not going to be using them for a long time then it could be a good idea to remove the batteries until you do need them.

Wednesday 17 December 2008

Planning, linking, websites and mimios/IWB

With mimios and IWBs comes a huge amount of activities already created for you. Plus there are all the other activities that are teacher made in Kidspiration, Inspiration, Word, PowerPoint etc. And then I see that teachers have found all these wonderful websites but are not fully utilising them to their full potential. How can we manage all these websites and activities we may have stored on our computers?
Answer: Incorporate it into your planning. Hyperlink the activities, websites, or teaching resources into your planning and launch the sites from there. This is a perfect way of managing all of these links and it is all in one place plus you are able to see what resources you are mainly using. In this example I have colour coded the activities, red for Flip charts, orange for PowerPoint, green for Inspiration, blue for websites and black for book work.

Proofreading using mimio or IWB


  • Choose a student's story that has been drafted on the computer and use that as a proof reading model at the beginning or end of a writing session
  • Have the whole class or maybe a targeted group discuss what changes need to be made and let the children take charge of the proofreading
  • use an example of drafted writing as a proofreading activity to be completed while waiting to conference (several children can be working on this activity at one time)
  • have a child drafting using the mimio/ IWB instead of in their books
  • have two children drafting on the mimio/ IWB creating a collaborative story, print out and they can proofread, edit and publish on their own
  • use the mimio/ IWB as one of the activities on your developmental circuit

mimios...some beginning thoughts

There are many mimios out in schools. A lot of teachers are not using them to their full potential, mostly because of technical issues of calibration, software and hardware conflicts, setting up problems and most of all lack of professional development.


In this particular school the mimio is attached to a LCD TV. This works well with small groups or the whole class on the mat in front of the TV. The mimio image was TV quality.

I would use the mimio attached to a TV screen more in the Junior school. It is least distacting for the whole class as it is smaller and could be used unobtrusively with small groups.

Activboards beginning thoughts

Many schools are investing in Interactive Whiteboards. A lot of teachers are not using them to their full potential, mostly because of technical issues of calibration, software and hardware conflicts, setting up problems and most of all lack of professional development. Then there is the issue of 'Which should we buy for our school?'

Here is one example of Activboards being used in one school. The Activboard has the projector attached to the screen. (Big tick here, no projector or wires hanging from ceilings or sitting precariously on tables).
The screen can be moved up and down according to the child's height. The screen is large and can be seen by the whole class right to the back of the room. Teachers have very little problems calibrating because the projector is fixed to the screen. There is a wireless keyboard that children or teacher can use anywhere in the classroom. The only down was maybe the clarity, the room needed to be darker or the projector needed to have higher lumens, but it was a minor point as it made no difference to the children.


The Activboard works well in the Senior School because it can be seen from the back of the room and when you have big children sitting in a classroom with all your furniture, there is not a lot of room for sitting up the front. I also liked how you could direct student's attention to it while they are working at their desks and they could all easily see it.

Monday 1 December 2008

Google Font

Create a cool title or heading for your Wiki or Blog using Google Font. Type in the words and click Create Logo!


Click on Download Logo


Do a right click over the logo and select Save Picture as


Save it to a folder on your computer and insert as a picture into your wiki or blog.

Tuesday 25 November 2008

SlideBoom and animated PowerPoint

Set up an account, upload animated PowerPoints with sounds, video, links, buttons and transitions to SlideBoom. Embed in blogs and wikis. Students will need to critique their PowerPoints before uploading, remind them that 'less is more' when adding effects to their slideshows.


Helping children to become better researchers

To teach children how to become competent researchers requires several stages. I like to use Inspiration (or Kidspiration) Graphic Organisers to guide them in this task. Once they have some knowledge of the topic at hand teachers generally set them an activity where they have to come up with a question to research about. Most children find this difficult.

That is why I use this Graphic Organiser 'What do we know about?' Students fill in what they know about the topic. I then ask them to choose one of the ideas that they would like to know more about. They then choose one of the ideas and turn that into a question.


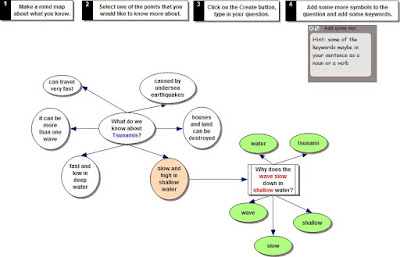
The nouns or verbs in the question are likely to be their search words.


The next step is to go to Google or any other search engine http://delicious.com/sharpjacqui/searchengines enter in the search words. Click on a website. Generally most of the websites they will choose will have a lot of text which can be quite daunting to read. This is when I introduce my trick of Ctrl F (Command - F for Macs). This brings up the 'Find' box,
type in one of the key words, if that word is on the page it will be highlighted, ask the child to read the sentence the word is highlighted in, refer them back to their research question and ask them if it answers their question, if not they click on the Next and that will highlight the next instance of that word, again they read that sentence. "Does it answer the research question?" If so the children highlight just that sentence, copy and paste into a Word document. They continue in this way until they have enough information that answers their research question.

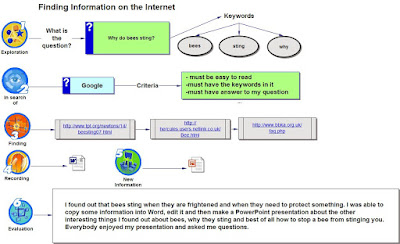
The next Graphic Organiser is the 'Finding Information on the Internet'.
Children type in
  • What the Question is
  • What the keywords are
  • the search engine they are going to use
  • the criteria for the websites they will use
  • the links to the websites
Under the Recording they can hyperlink the picture of the Word icon/symbol to the file they have created with all the copied material from websites. Under New Information is the link to the PowerPoint (or Keynote, or Photo Story, or MovieMaker or iMovie file) that contains the presentation they have made using the information they have found. Finally under Evaluation they type in their final thoughts about their research. This is great model for teachers and students alike. The teacher has a full assessment of the progress and procedures the child went through for their research. They can see what the question was, the key words used, the Internet sites used and then they can compare the 'Word' file with the final presentation to see if the child was able to make sense of the information they found and turn it into their own. Students are showing accountability for their learning by referencing the sites they have visited and demonstrating how they have turned their new knowledge into new information.
For this to work well and for students to become independent researchers this format needs to be repeated often. It can work well for novel studies, topic research, and as a starting point for several writing genres such as procedural, argument and explanation.

Wednesday 19 November 2008

Make Beliefs Comix


Create comics with characters, panel prompts and talk balloons MakebeliefsComix. Make 2, 3 or 4 page comics. You can't save or download the comics but you can Email or print (or take a screen capture and paste into Word or PowerPoint).
If you are taking a screen capture for showing in a PowerPoint then make sure that you only do a 2 page comic at a time, that way you will get a better image when you make it bigger on the screen.

Children from Hunua School went on class trip to the local Police Station. They presented the experience they had by creating comics in Make Beliefs Comix and then inserted the finished comics into PowerPoint.


Comic Life and Slideshows


You can make slideshows of comic pages in comic life. Before you start turn the page to horizontal. Go to File - Page Format, click on Landscape.

If this Library is not showing then click on the drop down menu and select Built in basic.

Click on the 'One' template and drag and drop on the page.

Drag your Photo in and add your text bubbles, headings and narrative text.
Add more pages with either 'One' template or with a template that has 2 or 3 spaces on it.
Once you have completed all your pages and saved them, then export them as individual jpegs. Go to File - Export - Export to Images.
The individual pages will be exported as separate jpegs.
These can now be imported into Photo Story, MovieMaker, Keynote or PowerPoint. Add music and you have a comic slideshow.

Tuesday 18 November 2008

Kidspiration, Word and Projectors

No Interactive Whiteboard or Internet access, what could she do?

I was in a class yesterday where the teacher was really keen to use her laptop and the school projector in her classroom teaching. I showed her how to set it up and we decided where was the best place to put it. Of course the projector is not suspended from the ceiling...it has to sit on a table, but we could work with that. And we had to use extension cords, so duct tape was used and new rule in the class imposed "Walk around the table rather then through the gaps!"
Next was the discussion of how to use this as a learning tool.

First of all we looked at the Kidspiration math activities that are available on the school server. These types of activities can be used as a teaching tool. Because we were projecting onto the whiteboard the children could go up and write the answers with whiteboard markers (which they love doing)and the teacher could also get children to come up and type in the answer.

And of course Kidspiration is a great authoring tool, very simple to create your own activities and if you are still using Version 1 or 2 then you must upgrade to Version 3 as it has a folder dedicated to great math activities that you can adjust to suit your class and a new view which gives you maths tools to create activities with.

So using the laptop and the projector for maths was easy... What about writing?

We talked about how she models her writing on the whiteboard in the class so I suggested that she use 'Microsoft Word' and the font Comic Sans with a large font size so that all children can see it.
It is a good idea while you are modeling the writing to turn off the capitilisation, (2007 go to Menu Button and select Word Options, click on Proofing, click on AutoCorrect Options, deselect Capitalise first letters of sentences, click OK) (2003, go to Tools, click on AutoCorrect Options, deselect Capitalise first letters of sentences, click OK)
Students can make corrections using white board markers. This is also a good opportunity to teach keyboarding editing skills, as you do the editing say what you are doing "I need to fix up a spelling mistake so I am going to take my mouse and click at the end of the word scool and I am pressing the Backspace key, now I am typing in the correct word". This is a common editing mistake I see children doing, instead of going and clicking on the word to correct it they will backspace a whole sentence , therefore wasting time as they have to type the sentence again. And of course this is great time to remind children what fingers they should be using, such as "What finger do I use to make a full stop?" Have a couple of old keyboards available so that children can pass them around and practice making the full stop with the ring finger on their right hand.
So even without Internet access there is still a lot of ways you can use a projector and a laptop!

Friday 14 November 2008

The Magic Line: Keyboarding Tip


Teachers of younger children often ask me how can small children learn how to type. I believe it is never too early to start keyboarding with children. Of course they can’t reach all of the letters because of their handspan and I certainly don’t expect them to be touch typing by six years old, but there are early strategies that can be put in place. Number one is getting children to use 2 hands on the keyboard. This is where the magic line comes in. I fold small pieces of paper and stick them between the T and Y, G and H, and the B and N. I call it the magic line and that means that the right hand never crosses over the magic line to the left hand side of the keyboard and vice versa. This also works well with older students who are still hunting and pecking.

Monday 10 November 2008

Friday 7 November 2008

The 'What if?' key


This must be one of the most versatile 'Thinkers' key. This question can be asked in any topic or curriculum area


Maths:
What if we changed the operation from + to x?


What if we added an oval shape to our angular tessellation?


Reading:
What if statements challenging or offering a different path to the way the story went


Writing
:
Argument Writing:
After writing the supporting points and examples, challenge these statements with What if questions.


Topic Studies:
The What if Thinker key should be used extensively in Topic Studies as it leads the learner into challenging situations.

Wednesday 5 November 2008

Recount Writing

Following on from the last post about Explanation writing here are my versions of Recount Writing for Seniors and Juniors

Recount Presentation
Get your own at Scribd or explore others: Education Recount


Junior Recount
Get your own at Scribd or explore others: Education Recount

Explanation Writing

When I start a new genre of writing I like to introduce it by preparing a PowerPoint that goes through all the steps of writing. For at least 2 weeks I would start my writing session with this presentation. Everyday we would start off our writing with this PowerPoint and we would concentrate on a different aspect each day i.e. Day Two...look at introductions (go over Present Tense) Day three...points in order. The PowerPoint would also be printed out so that children can refer to all of it at anytime. I like to have hyperlinked games incorporated into the presentation that can be played as part of the lesson, and children have access to these through a PowerPoint that is available on their computers .


I also design a framework that children can use on the computer or as a print out. Here is an example of one made in Kidspiration and here it is in Inspiration The more fluent the writer would depend how long they would spend on this framework. I would expect fluent writers to spend at least 2 to 3 days reworking and editing their writing.

Wednesday 29 October 2008

The Reverse Key


Tony Ryan's 'Reverse Key' uses words such as cannot, never and would not e.g. list things you would never/cannot,would not see.
When you are planning a unit, include a Reverse key

  • Healthy food Unit: Name 10 things you would not put on a sandwich?
  • Earthquake: What are some of the things you cannot do in an earthquake?
  • Zoo: Name 10 zoo animals that cannot live in your house
  • Weather: what are 6 things you would not do in a storm
Or use this key as a reading activity
  • Charlotte's Web: List 10 things Charlotte would never do?
  • Where the Wild Things are: List 6 things that the Wild Things would not do?
  • Fairytales: What 5 things could Snow White/Cinderella/ Rapunzel never do?
These answers could be completed as a collaborative group activity, adding ideas to a mindmapping diagram (such as as Kidspiration or Inspiration, or online mindmapping software such as bubbl.us) .

Sunday 26 October 2008

Zoho: Online Free Office Package

Zoho allows you to create WordProcessing documents, Slideshow Presentations, Spreadsheets, Databases, email, calendar, blog sites and more. And it is free. Which means if your students have internet connection at home but no suitable WordProcessing packages on their computer then they can use this suite of applications for their homework. Word, PowerPoint and Excel documents can be uploaded to Zoho, and vice versa you can download your Zoho documents into Word, PowerPoint or Excel or even in PDF file format.
There is a limit to what you can do regarding extra tools but the basics are there. You can insert photos, type text, insert tables, change fonts, size and colour, align text, print and save.


It also has an easy to use Database Creator so students could create their own surveys or databases

Thursday 23 October 2008

Computer labs and Management

After observing countless lab lessons and taking a few myself, there are a few strategies I would suggest teachers put in place

  1. Control signals to get attention
  2. Repetition
  3. Organisation of sites and links

1. It is important that all students will stop when you make a certain signal. You would use this when you want to demonstrate the same thing to everybody. The signals could be a clapping pattern or a voice pattern such as "hands off...look at me'. For older students I tend to use "thank you...looking at me". Then you should stop and wait until all students are looking at you, if they don't I would say "Oh dear, not everybody is looking at me, let's try again..." The common mistake I see teachers make is that they continue to shout instructions to the class while they are all still talking. Once you gain a few students attention, make the comment "Well done Johnny, your eyes are on me..." etc and soon all the students will be looking your way. If it has taken a long time to get their attention, then I would say once they are all looking at me "That was a bit slow, let's try that again, turn back to your computers...hands off, looking at me". Believe it or not, this works! Kids will respond to what you want them to do if you have set the rules and if you keep the same rules and routines constant.

2. As stated before, repetition works. If you keep to the same constant routines of behaviour in the computer lab, all your lessons will go smoothly. SO, make sure the students know what the attention signals are. For more tips on successful computer lessons click on this link 'Going to the computer lab'

3. For younger children particularly, I like to have the links organised through a hyperlinked PowerPoint or Keynote. These links will lead to the Website, game or file I have saved on the network. Students will need to know where to find the file, so make that clear at the start of the lesson, and how to put PowerPoint into Slideshow so that the links work. For older children you could have Class Delicious site organised with all the links to the websites they need to visit, categorised under curriculum areas, topics, or even Group names.

Tuesday 21 October 2008

Moblyng: Creating Photo Slideshows

Moblyng is free software that you can upload your photos to, organise them in many different formats, add music and titles if you wish and then embed the code into blogs or Wikis. I have used it here to showcase how some students I worked with recently took their own photographs after watching a slideshow I had made about 'How Kids can take great Photos'
You need to register first and set up an account before you can save the slideshow to get the embed code.

Sunday 19 October 2008

Education version of Glogster

Glogster has been around for a while but now they do an education version. You can create school accounts and keep Glogs private. They will be adding more features as time goes by. You do need to make sure you have the latest versions of Adobe flash for everything to work well.
Its catch phrase is 'Poster Yourself!' Insert photos, graphics, text boxes, speech bubbles, podcasts, movies (Youtube, webcam), hyperlinks to other files and sounds so that it becomes interactive. This is wonderful way for children to present their work and publish it to a blog, wiki or website. So instead of making a poster displaying children's knowledge, get them to make an interactive poster that links to the places they found their research i.e. online encyclopedias, movies etc


Examples of how to use Glogster
  • book reports
  • book trailers (advertising a book in the same way a movie trailer advertises a movie)
  • character analysis (picture of a character and labels)
  • publishing their writing (recounts, explanations, argument etc)
  • Inquiry learning presentation on a topic
  • posters for health (all about me, how to keep safe)
  • science (steps of an experiment, findings from an experiment)
  • comparison statements, insert photos or graphics and make comparisons
  • insert a glog that has different elements hyperlinked into the home page of a Wiki so it becomes the 'launcher' page that links to other pages

Thursday 16 October 2008

Keyboarding, projectors and PowerPoint


This is a PowerPoint slideshow that has different keyboard letters on each page. The first day you introduce this you would look at the home keys. Students will need to practice those for a couple of weeks. Once they have mastered the home keys then I would start introducing one letter at a time. Depending on how well the children have mastered the letter will decide when the next letter will be taught. These are drills that can be practiced when students come to the computer lab.

Oral Language and PowerPoint


A great activity for starting off the day is to timetable 3 children every morning to open up a PowerPoint that has links to

Those three children find something on those sites to report back to the rest of the class.


The next day three other children have a turn. I like the students to do this before school starts.

Handwriting, projectors and PowerPoint


I have prepared Handwriting examples for a class using the font Jarman. If you prepare all your handwriting lessons like this then you will always have them available. I have created them in PowerPoint. They can then be projected onto the screen for the children to copy out. Modelling how the letters are written can be done over the projection or on another whiteboard. I also like to have an individualised handwriting programme for my students so the separate PowerPoint slides can be printed out and laminated so you have class sets of the cards.

Wednesday 15 October 2008

Spelling, PowerPoint and hyperlinking


Create your week of spelling activities in PowerPoint. I like to use PowerPoint because I can hyperlink to websites and files on my computer. In this example I have listed the topic words for the week. Students who have access to the computers can type out this list 3 times and it is projected on the screen for the rest of the class to copy into their books. There is a hyperlink below that to a website called Look, Cover, Write and Check. You can type in your word list and be tested online. This is a great activity for fast finishers and for children who need some incentive to learn their words.
This next activity has been created in Jigzone. Upload a photo to Jigzone, set the number of pieces and save it. I created these images in PowerPoint by typing in all the words, rearranging them, inserting a shape behind them, grouping all the images and then right clicking to use the option 'Save as Picture'. Then I uploaded the image to Jigzone. I could then hyperlink the image I had made from PowerPoint to the jigsaw I had made.


This activity has been created in Inspiration and has been saved as a file to my computer. So all I had to do was hyperlink to the file from PowerPoint.